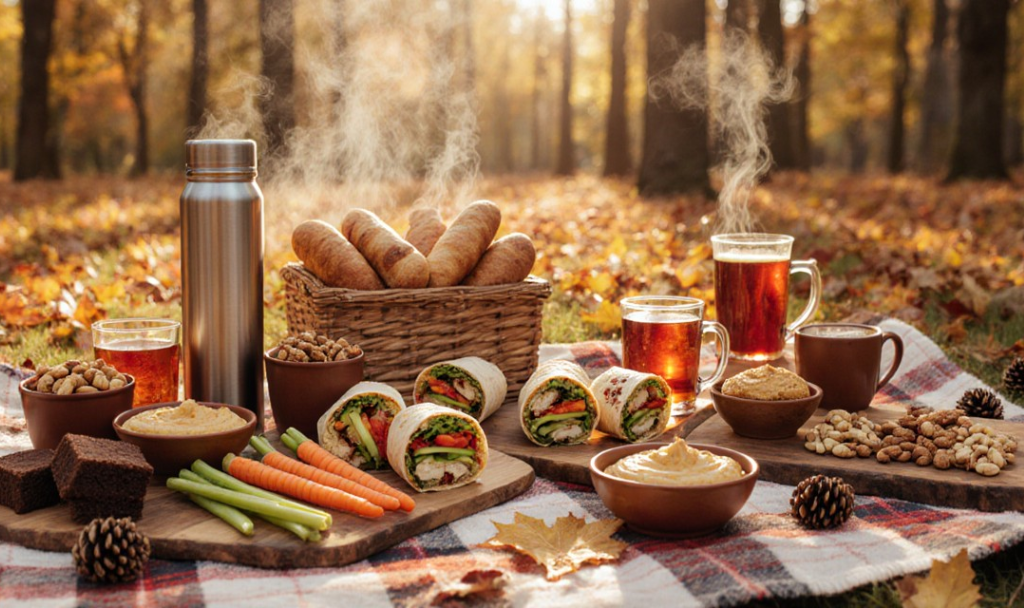
Halloween Party Food Ideas: Easy Recipes With Ingredients
Transform Your Halloween Party with These Spooky Recipes and Affordable Decor
Think about going to a Halloween party where the food table appears to have been taken straight from the set of a scary movie. Ghost-shaped cheese floats on pizza, mummy-wrapped hot dogs peek from platters, and eerie drinks that appear to glow in the low light. The best part is that you don't need expensive ingredients or a chef's skills to create this spooky menu.
These easy Halloween recipes will transform everyday items into spectacular party decorations, whether you're entertaining friends, family, or a mix of Boomers and Gen Z. We'll outline exactly what you need to buy, where to look for the best bargains, and how to make each meal in this post. The best part is that you'll be amazed at how accessible and doable these recipes are.
Ghostly Cheese Pizza: Easy Spooky Pizza with Ghost Mozzarella
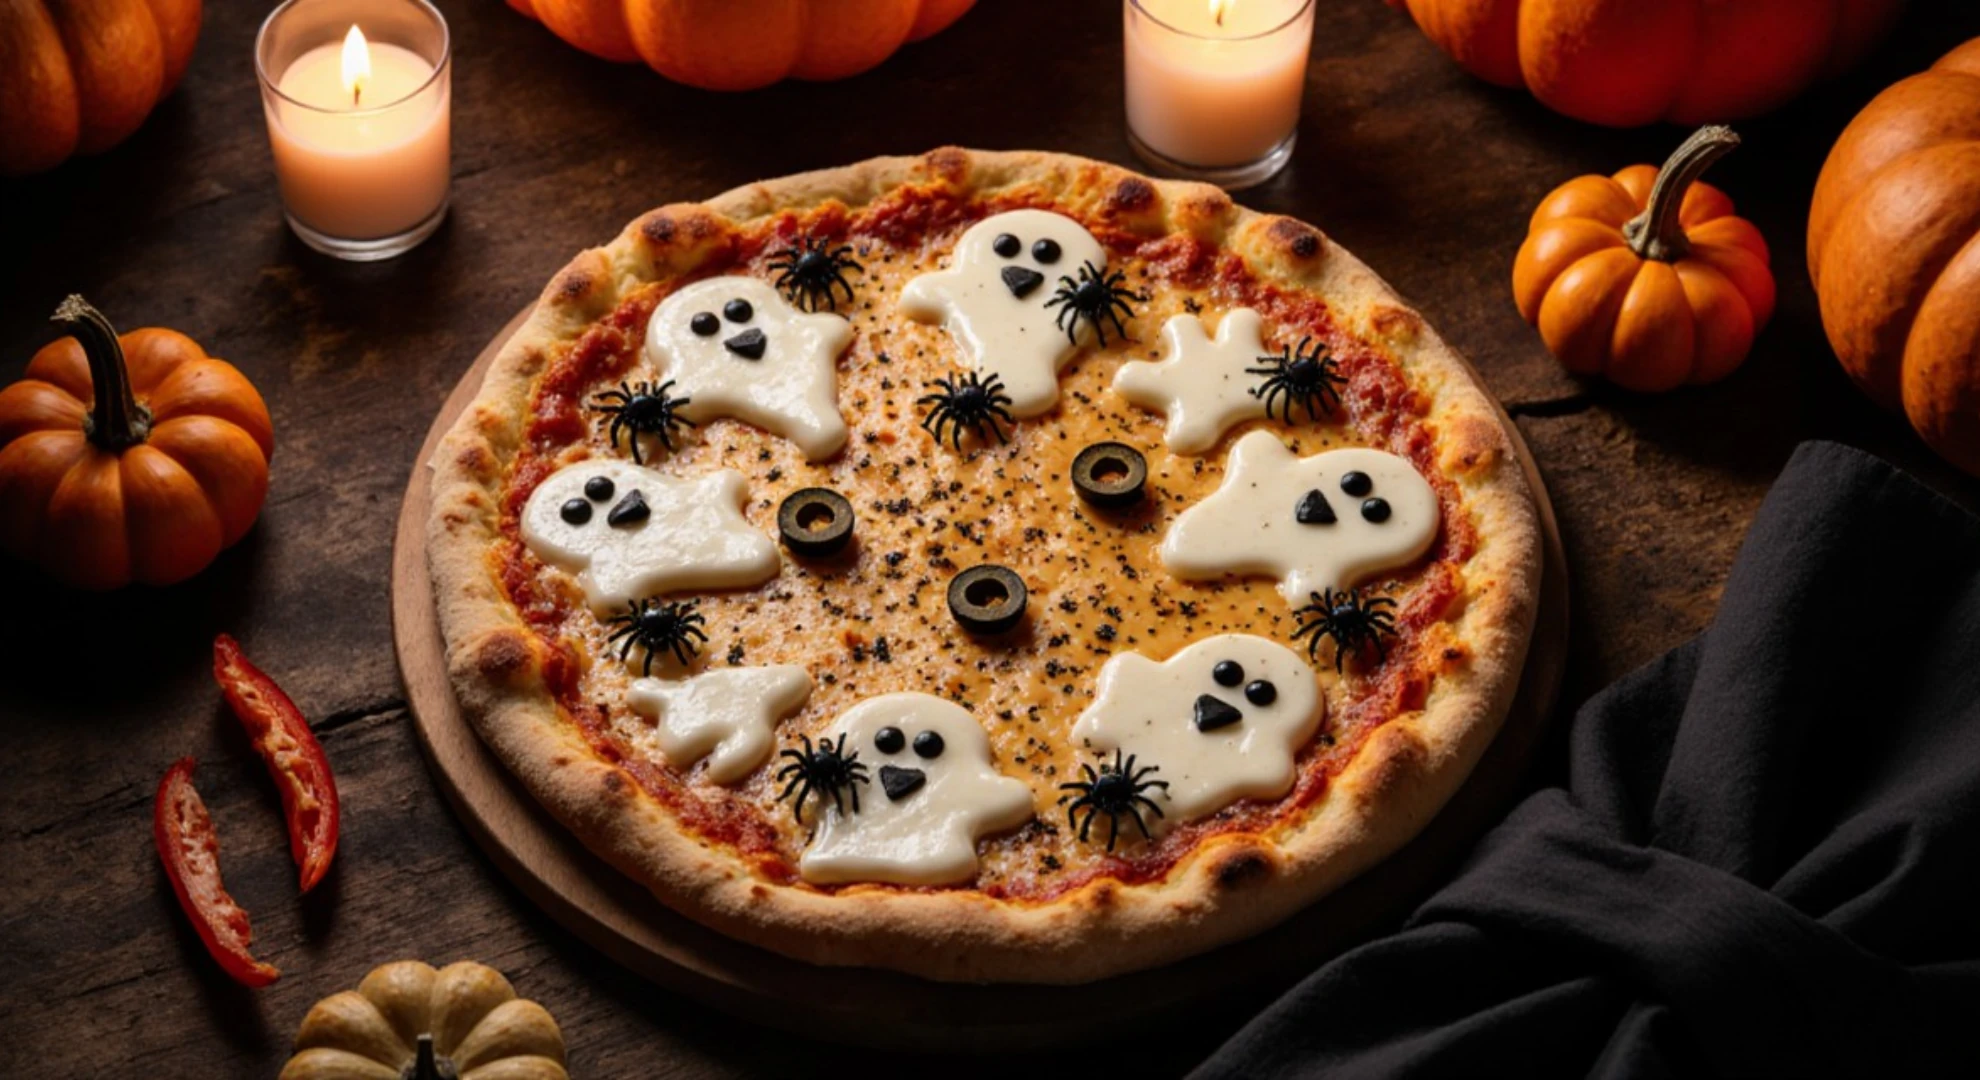
Let’s start by turning ordinary pizza into a haunting work of art to make everyone do a double-take! This ghostly cheese pizza combines the comfort food everyone loves with spooky Halloween flair. Using simple ghost-shaped mozzarella cutouts or the knife and imagination, your pizza becomes an instant conversation starter. For the brave souls at your party, add olive "spiders" crawling across the ghostly landscape for extra thrills.
Affordable Ingredients List:
Pizza Base:
- 2 large pre-made pizza crusts or naan bread
- 1 cup pizza sauce or marinara
- 2 cups shredded mozzarella cheese
- 8 oz block of mozzarella for ghost shapes
Spooky Toppings:
- 1 can black olives, pitted
- 1 small red bell pepper
- Italian seasoning
Pro tip: October is a hot month for sales for mozzarella. Use smart shopping tools like Costless that allow you to compare prices and find the best deals for cheese and other ingredients.
Step-by-Step Instructions:
- Prepare your cheese: Preheat oven to 425°F. Use a small ghost-shaped cookie cutter or knife to cut 8-10 ghost shapes from the mozzarella block. Make them about 2-3 inches tall.
- Build the base: Spread pizza sauce evenly on the crusts, leaving a 1-inch border. Sprinkle shredded mozzarella over the sauce, creating an even layer.
- Add the cheese: Place ghost-shaped mozzarella pieces across the pizza surface. Space them evenly so each slice gets at least one ghost.
- Create spiders (optional): Cut black olives in half lengthwise for spider bodies. Slice remaining olives into thin strips for spider legs. Place one olive half as the body, then arrange 8 thin strips around it as legs.
- Bake and finish: Bake for 12-15 minutes until the crust is golden and the cheese is bubbly. Use tiny pieces of red bell pepper for ghost "eyes" while the pizza is still hot - they'll stick to the melted cheese.
The final result? A professionally-looking pizza, but at a cost less than ordering takeout. Your visitors will be taking selfies before taking the first bite!
Mummy Hot Dogs: Classic Halloween Finger Food
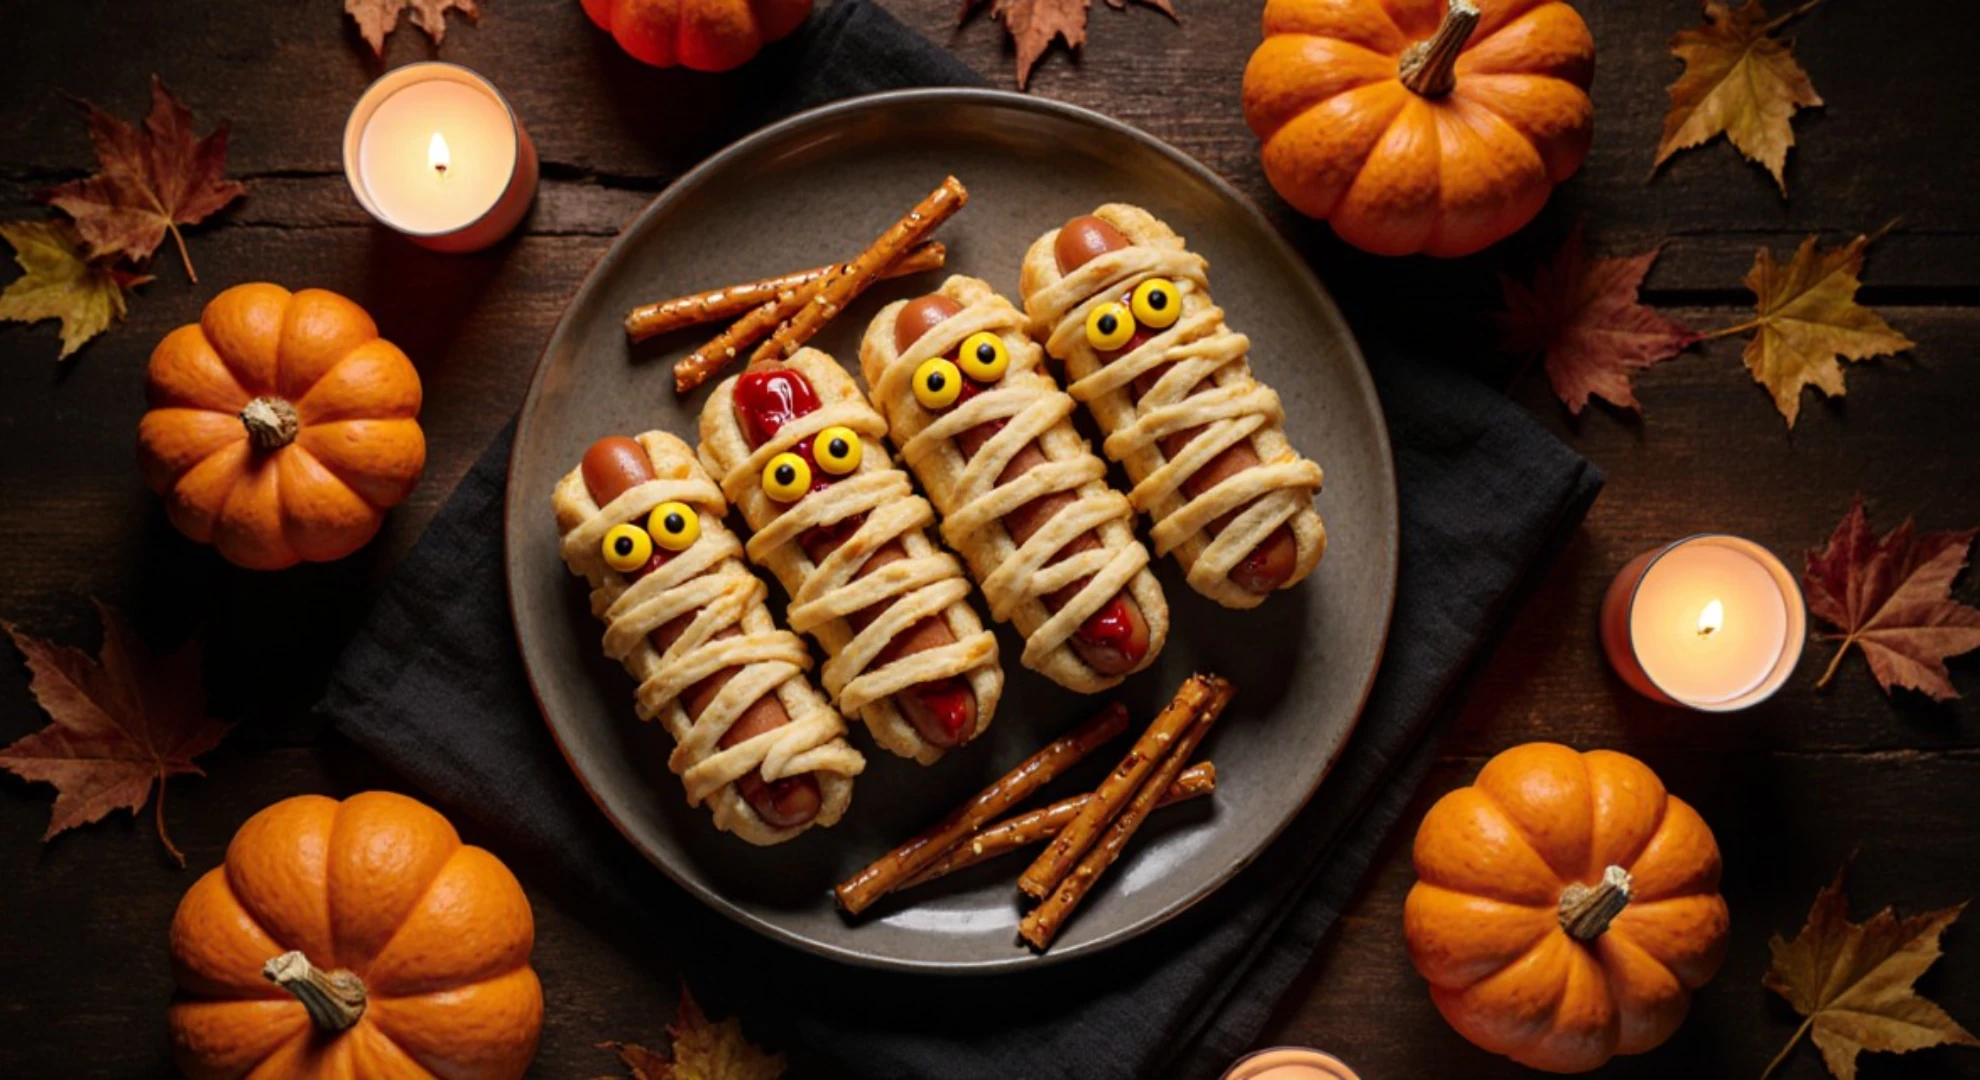
Mummy hot dogs are the ultimate Halloween party classic - you'll find them at every spooky gathering from adult costume parties to children's birthday celebrations. The thing is, most recipes overcomplicate this simple meal. Our recipe stands out because it only takes 15 to 20 minutes to make and requires only three cheap ingredients that you can buy at any grocery store. Nothing fancy here; no special tools or challenging methods are required. It's so much fun that even new chefs can master it.
Affordable Ingredients List:
Main Ingredients:
- 1 package regular hot dogs (x8 in a pack)
- 1 tube refrigerated crescent roll dough
- Yellow mustard for "eyes"
Optional Upgrades:
- Ketchup for "bloody" eyes
- Pretzel sticks for "broken bones"
Step-by-Step Instructions:
- Preparation: Preheat oven to 375°F. Line a baking sheet with parchment paper. Pat hot dogs dry with paper towels.
- Create mummy strips: Unroll crescent dough and separate into triangles. Cut each triangle into 3-4 thin strips lengthwise. You'll have plenty of "bandages" to work with.
- Wrap your mummies: Starting at one end of each hot dog, wrap dough strips around randomly, leaving gaps for that authentic mummy look. Leave the top inch unwrapped for the "face" area.
- Bake: Place wrapped hot dogs on a prepared baking sheet. Bake 12-15 minutes until the dough is golden brown and puffed.
- Add spooky eyes: While still warm, use a toothpick to dab two small dots of mustard on the unwrapped "face" area for eyes. For bloody eyes, mix mustard with a tiny drop of ketchup.
Pumpkin Jack-o'-Lantern Stuffed Peppers
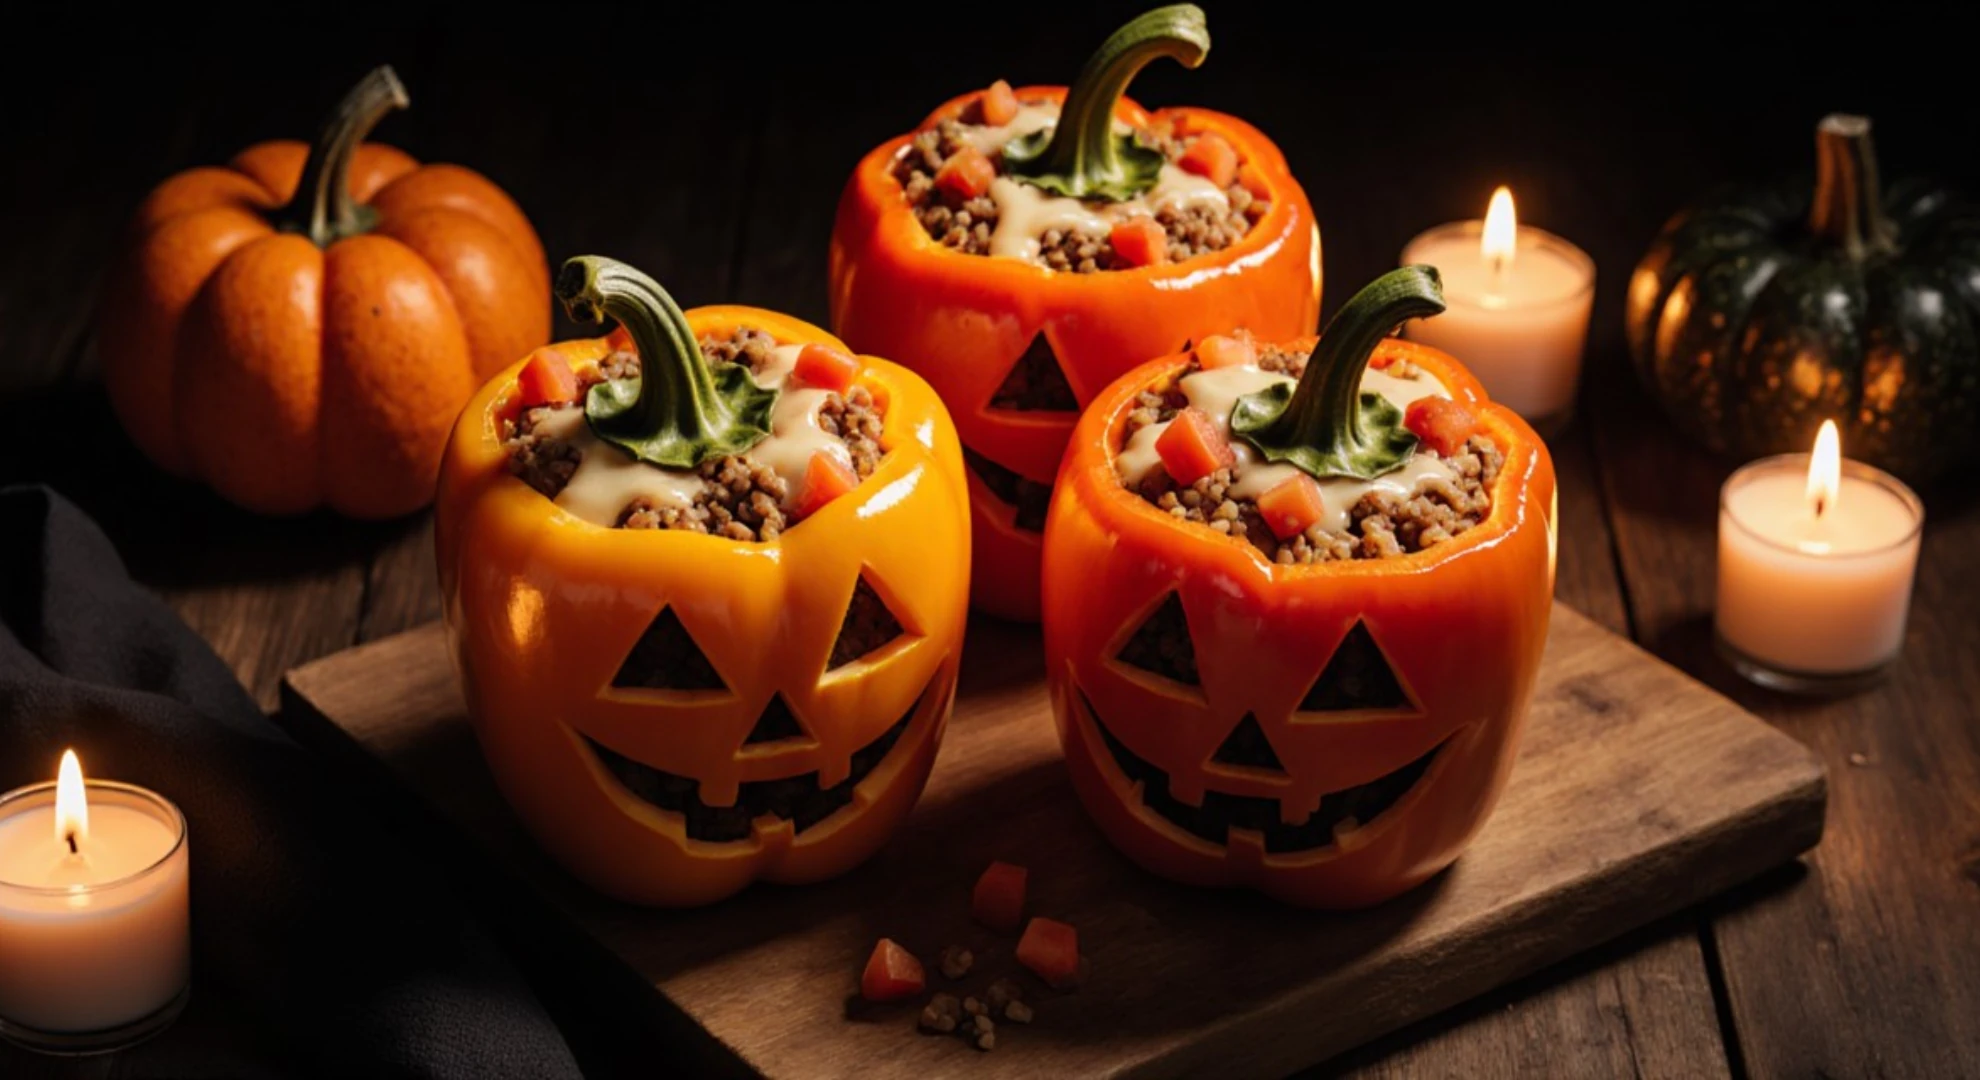
Although real pumpkins are the classic Halloween symbol, cooking with them is actually a time-consuming hassle. Preparing, roasting, cleaning, and carving a fresh pumpkin can take several hours. Our creative solution? These orange bell peppers look like little jack-o'-lanterns! These inventive alternatives are healthier than traditional Halloween meals, require only 25 minutes to prepare, and cost less than real pumpkins. You can still appreciate the creepy carved faces and festive orange color without having to deal with the mess or tedious preparation.
Affordable Ingredients List:
Main Components:
- 4 large orange bell peppers
- 1 lb ground turkey or beef
- 1 cup cooked rice (leftover works great!)
- 1 small onion, diced
- 1 can diced tomatoes
- 1 cup shredded cheese
Seasonings:
- 1 packet taco seasoning
- Salt and pepper
Pro Tip: Sometimes remembering every single ingredient or step might be complicated! Create a list before shopping, write down every step and product you need to buy. Costless can help you create a customizable shopping list directly in the app. Just add all the ingredients from this recipe (or even the entire Halloween menu), and you’ll have everything neatly organized and ready to go.
Step-by-Step Instructions:
- Prep your jack-o'-lanterns: Preheat oven to 375°F. Cut the tops off the peppers and remove seeds and membranes. Use a small knife to carve triangle "eyes" and a zigzag "mouth" on one side of each pepper.
- Make the filling: Brown ground meat in a large skillet over medium heat. Add diced onion and cook until softened. Stir in cooked rice, diced tomatoes, and taco seasoning. Cook 5 minutes until heated through.
- Stuff and top: Fill each carved pepper with the meat mixture, packing gently. Top with shredded cheese. Place in a baking dish with ¼ cup of water in the bottom.
- Bake to perfection: Cover with foil and bake 20 minutes. Remove foil and bake 5 more minutes until peppers are tender and cheese is bubbly.
- Serve with style: Let cool 5 minutes before serving.
Witches' Brew Punch: Non-Alcoholic Halloween Drinks for All Ages
Your guests will undoubtedly need something to wash it all down after consuming those mummy hot dogs, stuffed jack-o'-lantern peppers, and ghostly pizzas! Presenting our bubbling witches' brew punch, the ideal drink that tastes incredibly good, and has a mysteriously magical look that is crucial for a successful Halloween party menu. The finest aspect? Everyone will be requesting your secret recipe (spoiler alert: it's surprisingly easy!) because of the unsettling "smoking" effect it produces.
Affordable Ingredients List:
Base Brew:
- 2 liters of lemon-lime soda or ginger ale
- 4 cups grape juice
- 2 cups pineapple juice
- 1 packet lime Jell-O powder
Spooky Effects:
- 2 cups dry ice
- Gummy worms for garnish
- Plastic spiders for decoration
Serving Essentials:
- Large punch bowl
- Ladle and cups
Step-by-Step Instructions:
- Create the base: In a large punch bowl, mix grape juice, pineapple juice, and lime Jell-O powder. Stir until Jell-O completely dissolves - this gives your brew that mysterious, slightly thick consistency.
- Add the fizz: Slowly pour in lemon-lime soda or ginger ale. Stir gently to maintain carbonation. The mixture should have a murky appearance.
- Set the spooky scene: Float gummy worms throughout the punch.
- Add smoking effect: Just before serving, carefully add small pieces of dry ice using tongs. NEVER touch dry ice with bare hands! The "smoke" effect lasts about 10-15 minutes.
- Serve safely: Use a ladle to serve, making sure no dry ice pieces end up in individual cups. The punch should be consumed only after the dry ice has completely dissolved.
Monster Halloween Cupcakes: Easy Scary-Faced Decorations
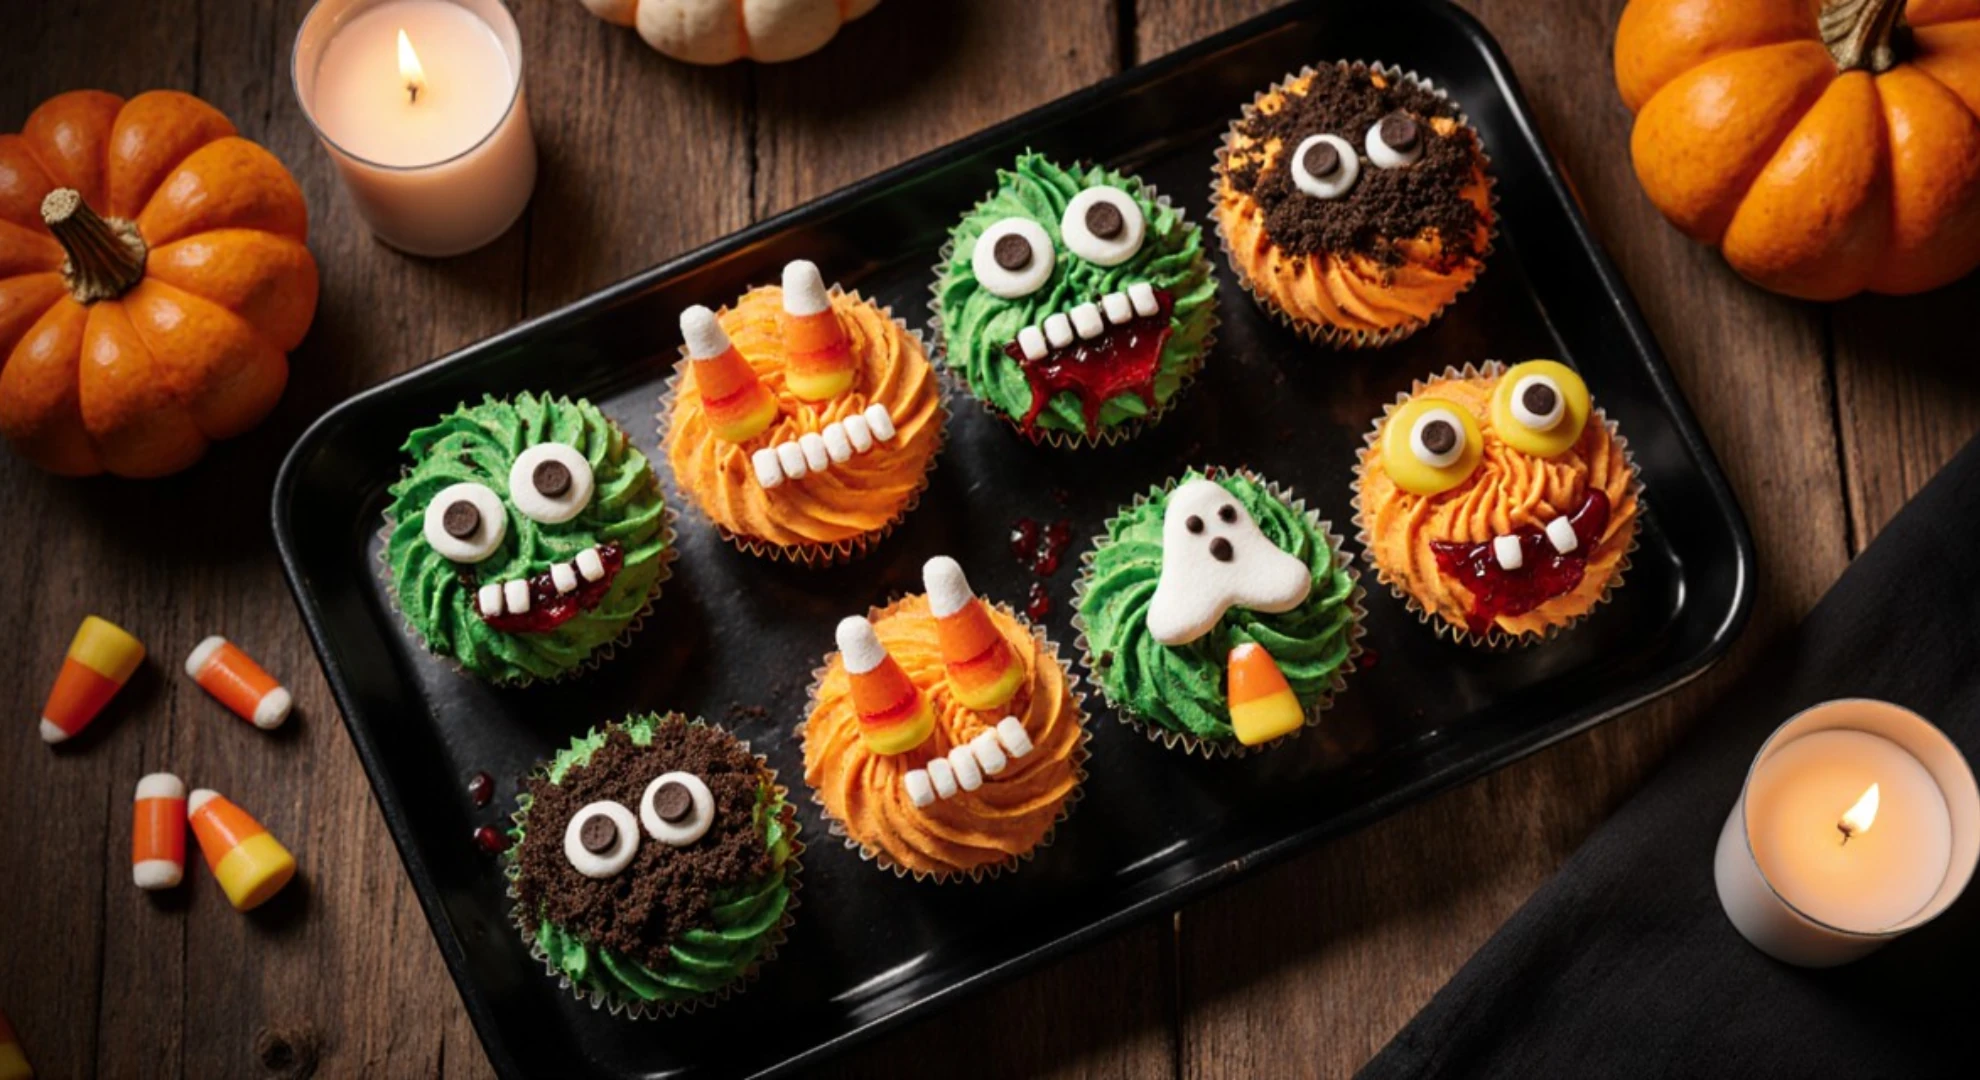
Show-stopping desserts are essential for any Halloween party, and these monster cupcakes provide maximum impact with little work. Using easy frosting techniques and inexpensive candy decorations, turn regular cupcakes into a terrifying procession of zombies, ghosts, and other monsters. Their flaws are what make them beautiful; the more lopsided and frightening they appear, the better! Store-bought cupcakes just can't compete with the individuality that each cupcake adds to your dessert table.
Affordable Ingredients List:
Cupcake Base:
- 1 box chocolate cake mix + required ingredients
- OR 12 pre-made cupcakes from the bakery section
Frosting Arsenal:
- 2 containers vanilla frosting
- Green food coloring
- Orange food coloring
Monster Features:
- Mini chocolate chips for eyes
- Candy corn pieces
- Oreo cookies for "dirt"
- Mini marshmallows for ghost shapes
- Red gel icing for "blood"
Step-by-Step Instructions:
- Preparation: Bake cupcakes according to box directions or use store-bought. Let cool completely before decorating - warm cupcakes make frosting melt!
- Create colored frostings: Divide vanilla frosting into bowls. Add green coloring to one bowl for zombie skin, orange to another for monster fur. Keep some white for ghosts.
- Make zombie cupcakes: Spread green frosting roughly with a knife for uneven "decaying" skin. Press mini chocolate chips for dead eyes. Use red gel icing to draw a crooked mouth and "wounds."
- Craft ghost cupcakes: Pipe white frosting in a dome shape, then pull up small peaks for a ghostly texture. Add two mini chocolate chips for spooky eyes.
- Design monster varieties: Use orange frosting for furry monsters, adding candy corn pieces as "fangs." Crush Oreos and sprinkle on some cupcakes for a "graveyard dirt" effect.
Candy Corn Parfait: Simple Halloween Desserts

This candy corn parfait is your Halloween hero if you're looking for a gorgeous dessert that doesn't require any baking skills! In sophisticated glass layers, these individual treats flawlessly replicate the classic candy corn colors. The finest aspect? Party day can be made stress-free by preparing everything hours in advance. Different flavors and textures are delivered with each spoonful, resulting in a dessert experience that is far more complex than the straightforward candy it represents.
Affordable Ingredients List:
Base Layers:
- 1 package vanilla pudding mix
- 2 cups of milk for pudding
- 1 container Cool Whip
- 1 package orange Jell-O
Color & Flavor:
- Yellow food coloring
- 1 cup crushed vanilla wafers
- Real candy corn for topping
Serving:
- 8 clear plastic cups or mason jars
Step-by-Step Instructions:
- Prepare your layers: Make vanilla pudding according to package directions. Let cool. Prepare orange Jell-O and refrigerate until almost set (about 1 hour).
- Create a yellow base: Mix half the Cool Whip with yellow food coloring until you get a sunny candy corn yellow. This becomes your bottom layer.
- Make orange middle: Fold remaining Cool Whip into the almost-set orange Jell-O for your middle layer. The texture should be fluffy but hold its shape.
- Assembly time: In clear cups, layer yellow mixture on bottom (about ⅓ full), then orange layer (middle ⅓), then top with plain vanilla pudding for the white "tip."
- Finishing touches: Sprinkle crushed vanilla wafers between layers for texture. Top each parfait with a few real candy corn pieces and refrigerate for at least 2 hours.
Graveyard Brownies: Brownies Transformed into a Spooky Cemetery Scene
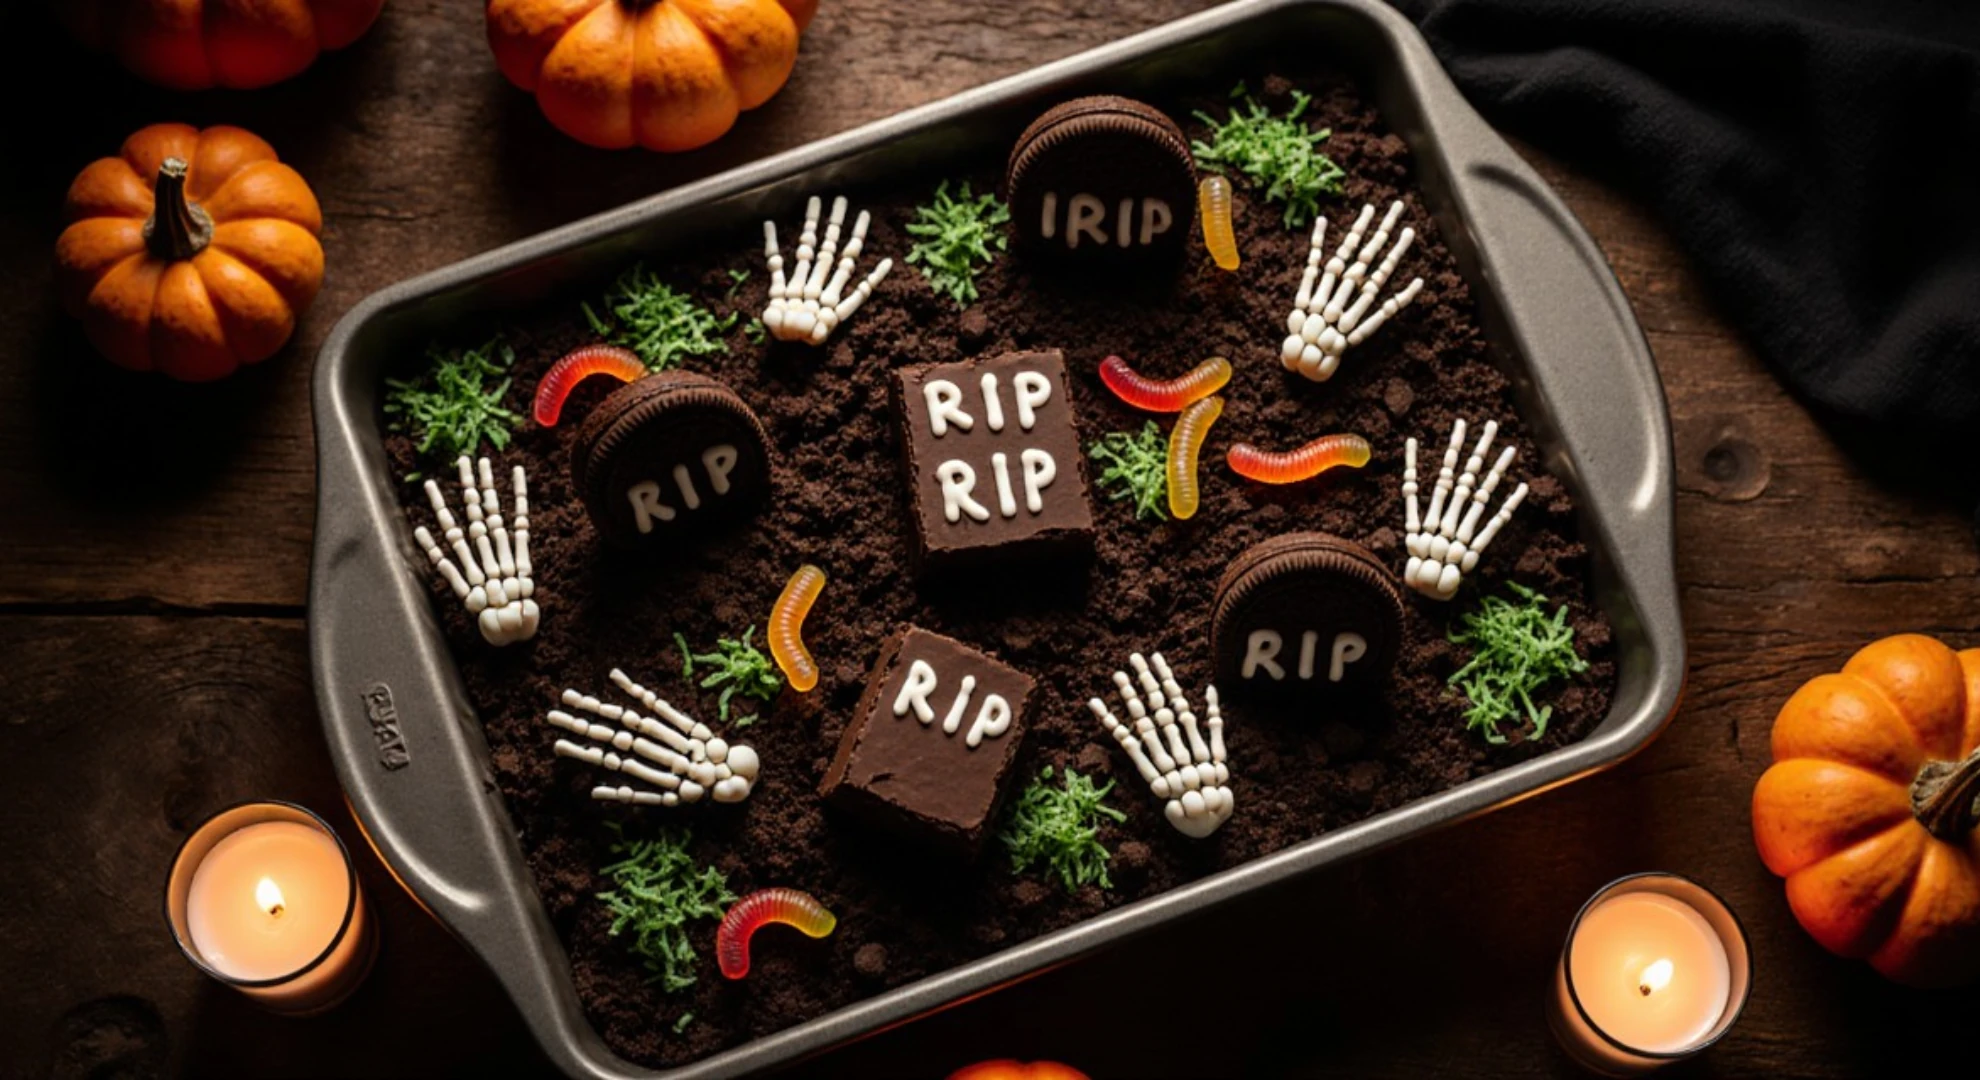
This inventive graveyard transformation will turn regular brownies into the perfect Halloween centerpiece! Your ordinary chocolate brownies can be transformed into a spooky cemetery with dirt, tombstones, and eerie surprises by using basic decorating techniques. This recipe, which is basically foolproof decorating that looks professionally designed, is ideal for party hosts who want maximum visual impact without requiring complex baking techniques.
Affordable Ingredients List:
Brownie Foundation:
- 1 box fudge brownie mix + required ingredients
- OR 9x13 pan pre-made brownies
Graveyard Elements:
- 1 package chocolate sandwich cookies (Oreos)
- 12-15 rectangular chocolate wafer cookies for tombstones
- 1 tube white decorating gel
- Gummy worms
- Green coconut flakes (optional grass)
Spooky Additions:
- Plastic skeleton hands
- Mini pumpkins or Halloween figures
Step-by-Step Instructions:
- Create your graveyard base: Bake brownies in a 9x13 pan according to directions (or use store-bought). Let cool completely - this is crucial for clean decorating.
- Make cemetery dirt: Crush chocolate sandwich cookies in a food processor or sealed bag with a rolling pin until you have fine "dirt" crumbs. Reserve some larger chunks for texture.
- Set tombstones: While brownies are still slightly warm, gently press rectangular wafer cookies vertically into the surface as tombstones. Space them randomly for an authentic cemetery look.
- Add inscriptions: Once completely cool, use white decorating gel to write "RIP," dates, or spooky sayings on each tombstone cookie.
- Finish the scene: Sprinkle cookie "dirt" over the entire surface, leaving tombstones visible. Push gummy worms partially into the dirt.
What started as simple brownies now looks like a professional movie set piece that'll be the talk of your party!
It doesn't take expensive ingredients, professional cooking techniques, or long hours in the kitchen to create a memorable Halloween party menu. These seven simple recipes demonstrate how you can turn everyday foods into amazing, haunting experiences that will keep your guests talking long after the party is over.
Build your confidence for the even larger celebration the following year by starting with just two or three of the recipes that most excite you. Don't forget to take pictures of your creations before your guests start eating them, and use price comparison websites like Costless to make the most of your party budget.